NSDate简单使用

// 获取系统当前时间 dasdasd
NSDate date = [NSDate date];
NSTimeInterval sec = [date timeIntervalSinceNow];
NSDate
currentDate = [[NSDate alloc] initWithTimeIntervalSinceNow:sec];

//设置时间输出格式:
NSDateFormatter df = [[NSDateFormatter alloc] init ];
[df setDateFormat:@”yyyy年MM月dd日 HH小时mm分ss秒”];
NSString
na = [df stringFromDate:currentDate];

NSLog(@”系统当前时间为:%@”,na);

UIImage简单使用

1
2
3
4
5
6
//NSData转换为UIImage
NSData *imageData = [NSData dataWithContentsOfFile: imagePath];
UIImage *image = [UIImage imageWithData: imageData]**;

//UIImage转换为NSData
**NSData *imageData = UIImagePNGRepresentation(aimae);

IOS中对图片的处理 UIImage
相信做项目时肯定会有用到 UIImage 这个类,那我们就来看一下这个类中都有什么内容。
其实这篇文章就是在看文档的时候想记录一下文档中得方法。
UIImage 继承于NSObject
下面介绍一下UIImage中的方法
首先是我们最常用的

通过图片的文件名来获取这个图片
+ (UIImage )imageNamed:(NSString )name
//要注意的是这个方法适用于已经导入到工程中的图片

创建新图片

1、+ (UIImage )imageWithContentsOfFile:(NSString )path
//通过文件加载指定路径下的文件内容获得新图片

2、+ (UIImage )imageWithData:(NSData )data
//通过一个NSData对象来获得图片
3、+ (UIImage )imageWithData:(NSData )data scale:(CGFloat)scale
//同上,只是再加上一个图片大小比例,用来改变图片的大小

4、+ (UIImage *)imageWithCGImage:(CGImageRef)cgImage
//使用Quartz 2D对象创建UIImage
5、+ (UIImage *)imageWithCGImage:(CGImageRef)imageRef scale:(CGFloat)scale orientation:(UIImageOrientation)orientation
//制定图片的比例和方向,其中方向是个枚举类。

6、+ (UIImage )imageWithCIImage:(CIImage )ciImage
//用一个Core Image 对象创建图像
7、+ (UIImage )imageWithCIImage:(CIImage )ciImage scale:(CGFloat)scale orientation:(UIImageOrientation)orientation
//再加上比例和图片方向

8、- (UIImage *)imageWithAlignmentRectInsets:(UIEdgeInsets)alignmentInsets
//返回指定矩形区域内的图像

9、+ (UIImage )animatedImageNamed:(NSString )name duration:(NSTimeInterval)duration
//创建一个动态图片,动态图片持续的时间为duration
10、+ (UIImage )animatedImageWithImages:(NSArray )images duration:(NSTimeInterval)duration
//用一组图片创建一个动态图片,动态持续时间duration

11、+ (UIImage )animatedResizableImageNamed:(NSString )name capInsets:(UIEdgeInsets)capInsets duration:(NSTimeInterval)duration
//创建一个在可变大小的图片上指定矩形区域内的动态图片
12、+ (UIImage )animatedResizableImageNamed:(NSString )name capInsets:(UIEdgeInsets)capInsets resizingMode:(UIImageResizingMode)resizingMode duration:(NSTimeInterval)duration
//同上,只是多了一个图片变化的方式,具体来说就是平铺或者拉伸

13、- (UIImage *)resizableImageWithCapInsets:(UIEdgeInsets)capInsets
//用制定矩形区域创建图像
14、- (UIImage *)resizableImageWithCapInsets:(UIEdgeInsets)capInsets resizingMode:(UIImageResizingMode)resizingMode
//同上,指定图片变化方式

初始化图片

方法的作用在从上面的一些方法中都能找到原型,这里就不一一注释了
1、– initWithContentsOfFile: //从文件加载图片
2、– initWithData: //用NSData对象初始化图片
3、– initWithData:scale: //用NSData对象,指定的比例,初始化图片
4、– initWithCGImage:
5、– initWithCGImage:scale:orientation:
6、– initWithCIImage:
7、– initWithCIImage:scale:orientation:

绘画图片

1、– drawAtPoint:
//在指定的点开始绘画图片,这个点就是图片的做上角顶点
2、- (void)drawAtPoint:(CGPoint)point blendMode:(CGBlendMode)blendMode alpha:(CGFloat)alpha
//在指定的点绘制整个图片,并使用自定义图片复合模式,并设置透明度

3、– drawInRect:
//在指定区域内绘制图片,可根据需要缩放图片
4、– drawInRect:blendMode:alpha:
//参照上面第二条
5、– drawAsPatternInRect:
//在指定区域内,平铺图片

image的属性
imageOrientation //图片的方向
size //图片的大小size
scale //图片的比例
resizingMode //图片变化方式
CGImage //潜在的Quartz image
CIImage //潜在的Core Image
images //返回一个由图片组成的数组,针对于由一组图片生成的动态图片
duration //返回动态图片持续的时间(即动态图片播放一遍的时间)
capInsets //图片上选定的区域
alignmentRectInsets //图片平铺的区域

AsyncSocket简单使用

有一段时间没有认真总结和写博客了

前段时间找工作、进入工作阶段。比较少静下来认真总结,现在静下心来总结一下最近的一些心得

前言
AsyncSocket介绍
AsyncSocket详解
AsyncSocket示例
一、前言

公司的项目用到了Socket编程,之前在学习的过程当中,用到的更多的还是http请求的方式。但是既然用到了就必须学习一下,所以就在网上找一些例子,然后想自己写一个demo。可是发现很多写iOS Socket的博客并没有很详细的说明,也可能是大神们觉得其他东西都浅显易懂。

自己专研了一下,将自己的一些理解总结出来,一方面整理自己的学习思路,另一方面,为一些和我有同样困惑的小伙伴们,稍做指引。

二、AsyncSocket介绍

1⃣️iOS中Socket编程的方式有哪些?

-BSD Socket

BSD Socket 是UNIX系统中通用的网络接口,它不仅支持各种不同的网络类型,而且也是一种内部进程之间的通信机制。而iOS系统其实本质就是UNIX,所以可以用,但是比较复杂。

-CFSocket

CFSocket是苹果提供给我们的使用Socket的方式,但是用起来还是会不太顺手。当然想使用的话,可以细细研究一下。

-AsyncSocket

这次博客的主讲内容,也是我们在开发项目中经常会用到的。

2⃣️为什么选择AsyncSocket?

iphone的CFNetwork编程比较艰深。使用AsyncSocket开源库来开发相对较简单,帮助我们封装了很多东西。

三、AsyncSocket详解

1⃣️说明

在我们开发当中,我们主要的任务是开发客户端。所以详解里主要将客户端的整个连接建立过程,以及在说明时候回调哪些函数。在后面的示例代码中,也会给出服务器端的简单开发。

2 过程详解

1.建立连接

  • (int)connectServer:(NSString *)hostIP port:(int)hostPort

2.连接成功后,会回调的函数

  • (void)onSocket:(AsyncSocket )sock didConnectToHost:(NSString )host port:(UInt16)port

3.发送数据

  • (void)writeData:(NSData *)data withTimeout:(NSTimeInterval)timeout tag:(long)tag;

4.接受数据

-(void)onSocket:(AsyncSocket )sock didReadData:(NSData )data withTag:(long)tag

5.断开连接

  • (void)onSocket:(AsyncSocket )sock willDisconnectWithError:(NSError )err

  • (void)onSocketDidDisconnect:(AsyncSocket *)sock

主要就是上述的几个方法,只是说在真正开发当中,很可能我们在收发数据的时候,我们收发的数据并不仅仅是一个字符串包装成NSData即可,我们很可能会发送结构体等类型,这个时候我们就需要和服务器端的人员协作来开发:定义怎样的结构体。

四、AsyncSocket示例

客户端代码

1
2
3
4
5
6
7
8
9
10
11
12
13
14
15
16
17
18
19
20
21
22
23
24
25
26
27
28
29
30
31
32
33
34
35
36
37
38
39
40
41
42
43
44
45
46
47
48
49
50
51
52
53
54
55
56
57
58
59
60
61
62
63
64
65
66
67
68
69
70
71
72
73
74
75
76
77
78
79
80
81
82
83
84
85
86
87
88
89
90
91
92
93
94
95
96
97
98
99
100
101
102
103
104
105
106
107
108
109
110
111
112
113
114
115
116
117
118
119
120
121
122
123
124
125
126
127
128
129
130
131
132
133
134
135
136
137
138
139
140
141
#import "ViewController.h"

#define SRV_CONNECTED 0
#define SRV_CONNECT_SUC 1
#define SRV_CONNECT_FAIL 2
#define HOST_IP @"192.168.83.40"
#define HOST_PORT 8008

@interface ViewController ()
{
NSString *_content;
}
-(int) connectServer: (NSString *) hostIP port:(int) hostPort;
-(void)showMessage:(NSString *) msg;
@end

@implementation ViewController

@synthesize clientSocket,tbInputMsg,lblOutputMsg;

#pragma mark - view lifecycle
- (void)viewDidLoad
{
[super viewDidLoad];

[self connectServer:HOST_IP port:HOST_PORT];
}
- (void)viewDidUnload
{
[super viewDidUnload];
[clientSocket release], clientSocket = nil;
[tbInputMsg release], tbInputMsg = nil;
[lblOutputMsg release], lblOutputMsg = nil;
}

- (int)connectServer:(NSString *)hostIP port:(int)hostPort
{
if (clientSocket == nil)
{
// 在需要联接地方使用connectToHost联接服务器
clientSocket = [[AsyncSocket alloc] initWithDelegate:self];
NSError *err = nil;
if (![clientSocket connectToHost:hostIP onPort:hostPort error:&err])
{
NSLog(@"Error %d:%@", err.code, [err localizedDescription]);

UIAlertView *alert = [[UIAlertView alloc] initWithTitle:[@"Connection failed to host" stringByAppendingString:hostIP] message:[NSString stringWithFormat:@"%d:%@",err.code,err.localizedDescription] delegate:self cancelButtonTitle:@"OK" otherButtonTitles:nil];
[alert show];
[alert release];
return SRV_CONNECT_FAIL;
} else {
NSLog(@"Connected!");
return SRV_CONNECT_SUC;
}
}
else {
return SRV_CONNECTED;
}
}

#pragma mark - IBAction
// 发送数据
- (IBAction) sendMsg:(id)sender
{
NSString *inputMsgStr = tbInputMsg.text;
NSString * content = [inputMsgStr stringByAppendingString:@"\r\n"];
NSLog(@"%@",content);
NSData *data = [content dataUsingEncoding:NSUTF8StringEncoding];
// NSData *data = [content dataUsingEncoding:NSISOLatin1StringEncoding];
[clientSocket writeData:data withTimeout:-1 tag:0];
}
// 连接/重新连接
- (IBAction) reconnect:(id)sender
{
int stat = [self connectServer:HOST_IP port:HOST_PORT];
switch (stat) {
case SRV_CONNECT_SUC:
[self showMessage:@"connect success"];
break;
case SRV_CONNECTED:
[self showMessage:@"It's connected,don't agian"];
break;
default:
break;
}
}
- (void)showMessage:(NSString *)msg
{
UIAlertView * alert = [[UIAlertView alloc]initWithTitle:@"Alert!"
message:msg
delegate:nil
cancelButtonTitle:@"OK"
otherButtonTitles:nil];
[alert show];
[alert release];
}
- (IBAction)textFieldDoneEditing:(id)sender
{
[tbInputMsg resignFirstResponder];
}
- (IBAction)backgroundTouch:(id)sender
{
[tbInputMsg resignFirstResponder];
}

#pragma mark socket delegate
- (void)onSocket:(AsyncSocket *)sock didConnectToHost:(NSString *)host port:(UInt16)port
{
[clientSocket readDataWithTimeout:-1 tag:0];
}

- (void)onSocket:(AsyncSocket *)sock willDisconnectWithError:(NSError *)err
{
NSLog(@"Error");
}

- (void)onSocketDidDisconnect:(AsyncSocket *)sock
{
NSString *msg = @"Sorry this connect is failure";
[self showMessage:msg];
[msg release];
clientSocket = nil;
}

- (void)onSocketDidSecure:(AsyncSocket *)sock
{
}

// 接收到数据(可以通过tag区分)
-(void)onSocket:(AsyncSocket *)sock didReadData:(NSData *)data withTag:(long)tag
{
NSString* aStr = [[NSString alloc] initWithData:data encoding:NSUTF8StringEncoding];
_content = lblOutputMsg.text;
NSLog(@"Hava received datas is :%@",aStr);
NSString *newStr = [NSString stringWithFormat:@"\n%@", aStr];
lblOutputMsg.text = [_content stringByAppendingString:newStr];
[aStr release];
[clientSocket readDataWithTimeout:-1 tag:0];
}

@end

服务器端代码

1
2
3
4
5
6
7
8
9
10
11
12
13
14
15
16
17
18
19
20
21
22
23
24
25
26
27
28
29
30
31
32
33
34
35
36
37
38
39
40
41
42
43
44
45
46
47
48
49
50
51
52
53
54
55
56
57
58
59
60
61
62
63
64
65
66
67
68
69
70
71
72
73
74
75
76
77
78
79
80
81
82
83
84
85
86
87
88
89
90
91
92
93
94
95
96
97
98
99
100
101
102
103
104
105
106
107
108
109
110
111
112
113
114
115
116
117
118
119
120
121
122
123
124
125
126
127
128
129
130
131
132
133
134
135
136
137
138
139
140
141
142
143
144
145
146
147
148
149
150
151
152
153
154
155
156
157
158
159
160
161
162
163
164
165
166
167
168
169
170
171
172
173
174
175
176
177
178
179
180
181
182
183
184
185
186
187
188
189
190
191
192
193
#import "SocketView.h"
#import "AsyncSocket.h"

#define WELCOME_MSG 0
#define ECHO_MSG 1

#define FORMAT(format, ...) [NSString stringWithFormat:(format), ##__VA_ARGS__]

@interface SocketView (PrivateAPI)
- (void)logError:(NSString *)msg;
- (void)logInfo:(NSString *)msg;
- (void)logMessage:(NSString *)msg;
@end

@implementation SocketView

// 初始化
- (void)awakeFromNib
{
listenSocket = [[AsyncSocket alloc] initWithDelegate:self];
[listenSocket setRunLoopModes:[NSArray arrayWithObject:NSRunLoopCommonModes]];

connectedSockets = [[NSMutableArray alloc] initWithCapacity:1];
isRunning = NO;

[logView setString:@""];
// [portField setString:@"8080"];
}

- (IBAction)startStop:(id)sender
{
if(!isRunning)
{
int port = [portField intValue];

if(port < 0 || port > 65535)
{
port = 0; // 会随即取端口
}

NSError *error = nil;
if(![listenSocket acceptOnPort:port error:&error])
{
[self logError:FORMAT(@"Error starting server: %@", error)];
return;
}

[self logInfo:FORMAT(@"Echo server started on port %hu", [listenSocket localPort])];
isRunning = YES;

[portField setEnabled:NO];
[startStopButton setTitle:@"Stop"];
}
else
{
// Stop accepting connections
[listenSocket disconnect];

// Stop any client connections
int i;
for(i = 0; i < [connectedSockets count]; i++)
{
// Call disconnect on the socket,
// which will invoke the onSocketDidDisconnect: method,
// which will remove the socket from the list.
[[connectedSockets objectAtIndex:i] disconnect];
}

[self logInfo:@"Stopped Echo server"];
isRunning = false;

[portField setEnabled:YES];
[startStopButton setTitle:@"Start"];
}
}

- (void)scrollToBottom
{
NSScrollView *scrollView = [logView enclosingScrollView];
NSPoint newScrollOrigin;

if ([[scrollView documentView] isFlipped])
newScrollOrigin = NSMakePoint(0.0, NSMaxY([[scrollView documentView] frame]));
else
newScrollOrigin = NSMakePoint(0.0, 0.0);

[[scrollView documentView] scrollPoint:newScrollOrigin];
}

- (void)logError:(NSString *)msg
{
NSString *paragraph = [NSString stringWithFormat:@"%@\n", msg];

NSMutableDictionary *attributes = [NSMutableDictionary dictionaryWithCapacity:1];
[attributes setObject:[NSColor redColor] forKey:NSForegroundColorAttributeName];

NSAttributedString *as = [[NSAttributedString alloc] initWithString:paragraph attributes:attributes];
[as autorelease];

[[logView textStorage] appendAttributedString:as];
[self scrollToBottom];
}

- (void)logInfo:(NSString *)msg
{
NSString *paragraph = [NSString stringWithFormat:@"%@\n", msg];

NSMutableDictionary *attributes = [NSMutableDictionary dictionaryWithCapacity:1];
[attributes setObject:[NSColor purpleColor] forKey:NSForegroundColorAttributeName];

NSAttributedString *as = [[NSAttributedString alloc] initWithString:paragraph attributes:attributes];
[as autorelease];

[[logView textStorage] appendAttributedString:as];
[self scrollToBottom];
}

- (void)logMessage:(NSString *)msg
{
NSString *paragraph = [NSString stringWithFormat:@"%@\n", msg];

NSMutableDictionary *attributes = [NSMutableDictionary dictionaryWithCapacity:1];
[attributes setObject:[NSColor blackColor] forKey:NSForegroundColorAttributeName];

NSAttributedString *as = [[NSAttributedString alloc] initWithString:paragraph attributes:attributes];
[as autorelease];

[[logView textStorage] appendAttributedString:as];
[self scrollToBottom];
}

- (void)onSocket:(AsyncSocket *)sock didAcceptNewSocket:(AsyncSocket *)newSocket
{
[connectedSockets addObject:newSocket];
}

// 客户连接成功!
- (void)onSocket:(AsyncSocket *)sock didConnectToHost:(NSString *)host port:(UInt16)port
{
[self logInfo:FORMAT(@"Accepted client %@:%hu", host, port)];

NSString *welcomeMsg = @"恭喜您,已经通过scoket连接上服务器!";
NSData *welcomeData = [welcomeMsg dataUsingEncoding:NSUTF8StringEncoding];

[sock writeData:welcomeData withTimeout:-1 tag:WELCOME_MSG];

// We could call readDataToData:withTimeout:tag: here - that would be perfectly fine.
// If we did this, we want to add a check in onSocket:didWriteDataWithTag: and only
// queue another read if tag != WELCOME_MSG.
}

- (void)onSocket:(AsyncSocket *)sock didWriteDataWithTag:(long)tag
{
[sock readDataToData:[AsyncSocket CRLFData] withTimeout:-1 tag:0];
}
// 接收到数据
- (void)onSocket:(AsyncSocket *)sock didReadData:(NSData *)data withTag:(long)tag
{
NSData *strData = [data subdataWithRange:NSMakeRange(0, [data length] - 2)];
NSString *recvMsg = [[[NSString alloc] initWithData:strData encoding:NSUTF8StringEncoding] autorelease];
if(recvMsg)
{
[self logMessage:recvMsg];
}
else
{
[self logError:@"Error converting received data into UTF-8 String"];
}
NSString *backStr = nil;
for (AsyncSocket *socket in connectedSockets) {
if ([sock isEqualTo:socket]) {
backStr = [NSString stringWithFormat:@"我说: %@",recvMsg];
} else {
backStr = [NSString stringWithFormat:@"他说: %@",recvMsg];
}
}

// 回发数据
NSData* backData = [backStr dataUsingEncoding:NSUTF8StringEncoding];
[sock writeData:backData withTimeout:-1 tag:ECHO_MSG];
}

- (void)onSocket:(AsyncSocket *)sock willDisconnectWithError:(NSError *)err
{
[self logInfo:FORMAT(@"Client Disconnected: %@:%hu", [sock connectedHost], [sock connectedPort])];
}

- (void)onSocketDidDisconnect:(AsyncSocket *)sock
{
[connectedSockets removeObject:sock];
}

@end

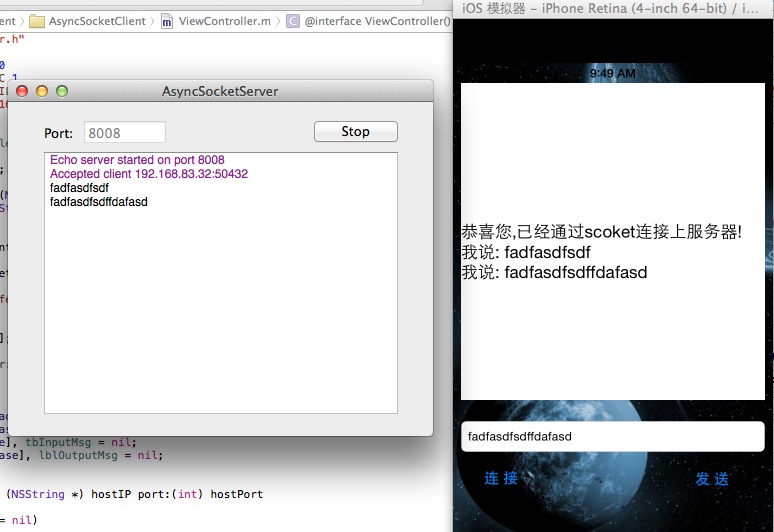
界面搭建
界面搭建

源代码 (/CodeSource/AsyncSocket/AsyncSocket.zip)

IOSFamousBlog

中文 iOS/Mac 开发博客列表

本博客列表会不断更新维护,如果有推荐的博客,请到此处提交博客信息

本博客列表涉及的文章内容支持 定制化Google搜索,特别感谢 JeOam 提供并帮助更新。

本博客列表也提供同步更新的OPML文件(下载OPML文件),可供导入到例如feedly等第三方定阅工具中,特别感谢 lcepy 提供自动转换脚本。这里有导入教程

博客地址 RSS地址
OneV’s Den http://onevcat.com/atom.xml
破船之家 http://beyondvincent.com/atom.xml
NSHipster http://nshipster.cn/feed.xml
Limboy 无网不剩 http://feeds.feedburner.com/lzyy
唐巧的技术博客 http://blog.devtang.com/atom.xml
Lex Tang http://lexrus.com/feed.xml
念茜的博客 http://nianxi.net/feed.xml
Xcode Dev http://blog.xcodev.com/atom.xml
Ted’s Homepage http://wufawei.com/feed
txx’s blog http://blog.t-xx.me/atom.xml
Kevin Blog http://zhowkev.in/rss
阿毛的蛋疼地 http://www.xiangwangfeng.com/atom.xml
亚庆的 Blog http://billwang1990.github.io/atom.xml
Nonomori http://nonomori.farbox.com/feed
言无不尽 http://tang3w.com/atom.xml
Wonderffee’s Blog http://wonderffee.github.io/atom.xml
I’m TualatriX http://imtx.me/feed/latest/
Cocoabit http://blog.cocoabit.com/rss/
nixzhu on scriptogr.am http://nixzhu.me/feed
不会开机的男孩 http://studentdeng.github.io/atom.xml
Nico http://blog.inico.me/atom.xml
阿峰的技术窝窝 http://hufeng825.github.io/atom.xml
answer_huang http://answerhuang.duapp.com/index.php/feed/
webfrogs http://blog.nswebfrog.com/feed/
代码手工艺人 http://joeyio.com/atom.xml
Lancy’s Blog http://gracelancy.com/atom.xml
I’m Allen http://www.imallen.com/atom.xml
Travis’ Blog http://imi.im/feed
王中周的技术博客 http://wangzz.github.io/atom.xml
会写代码的猪 http://gaosboy.com/feed/atom/
克伟的博客 http://feed.cnblogs.com/blog/u/23857/rss
摇滚诗人 http://feed.cnblogs.com/blog/u/35410/rss
Luke’s Homepage http://geeklu.com/feed/
萧宸宇 http://iiiyu.com/atom.xml
Yuan博客 http://www.heyuan110.com/?feed=rss2
Shining IO http://shiningio.com/atom.xml
YIFEIYANG–易飞扬的博客 http://www.yifeiyang.net/feed
KooFrank’s Blog http://koofrank.com/rss
hello it works http://helloitworks.com/feed
码农人生 http://msching.github.io/atom.xml
玉令天下的Blog http://yulingtianxia.com/atom.xml
不掏蜂窝的熊 http://www.hotobear.com/?feed=rss2
猫·仁波切 https://andelf.github.io/atom.xml
煲仔饭 http://ivoryxiong.org/feed.xml
里脊串的开发随笔 http://adad184.com/atom.xml
Chun Tips http://chun.tips/atom.xml
Why’s blog - 汪海的实验室 http://blog.callmewhy.com/atom.xml
土土哥的技术Blog http://tutuge.me/atom.xml
庞海礁的个人空间 http://www.olinone.com/?feed=rss2
Casa Taloyum http://casatwy.com/feeds/all.atom.xml
Kenshin Cui’s Blog http://www.cnblogs.com/kenshincui/rss
技术哥的博客 http://suenblog.duapp.com/rss/
老谭笔记 http://www.tanhao.me/atom.xml
coderyi http://www.coderyi.com/feed
雷纯锋的技术博客 http://blog.leichunfeng.com/atom.xml

Hexo

77 nvm -help
78 brew install node
79 ruby -e “$(curl -fsSL https://raw.github.com/Homebrew/homebrew/go/install)”
80 ruby -e “$(curl -fsSL https://raw.github.com/Homebrew/homebrew/go/install)”
81 ruby -e “$(curl -fsSL https://raw.github.com/Homebrew/homebrew/go/install)”
82 ruby -e “$(curl -fsSL https://raw.githubusercontent.com/Homebrew/install/master/install)”
83 git clone git://github.com/creationix/nvm.git ~/nvm
84 nvm
85 cd ~/Users/a000/nvm
86 ls
87 cd /Users/a000/nvm
88 ls
89 cd ../
90 “/Users/a000/nvm/nvm.sh” >> ~/.bash_profile
91 vi ~/.bash_profile
92 vi ~/.bash_profile
93 nvm
94 vi ~/.bash_profile
95 vi ~/.bash_profile
96 vi ~/.bash_profile
97 cat ~/.bash_profile
98 nvm
99 echo “. ~/.nvm/nvm.sh” >> ~/.bash_profile
100 nvm
101 cat ~/.bash_profile
102 cd ~/.nvm/
103 cd ~/nvm/
104 ls
105 vi ~/.bash_profile
106 nvm
107 cat ~/.bash_profile
108 cd ~/nvm/nvm.sh
109 cd ~/nvm/
110 ls
111 vi ~/.bash_profile
112 cat ~/.bash_profile
113 nvm
114 brew install node
115 brew link node
116 sudo brew install node
117 brew –help
118 /Users/a000/Desktop/uninstall_node.sh
119 git clone git://github.com/creationix/nvm.git ~/nvm
120 echo “. ~/.nvm/nvm.sh” >> ~/.bash_profile
121 vi ~/.bash_profile
122 vi ~/.bash_profile
123 nvm
124 vi ~/.bash_profile
125 nvm
126 cd ~/Users
127 cd nvm
128 ls
129 cd ../
130 pwd
131 cd nvm
132 l
133 ls
134 pwd
135 nvm
136 cd nvm
137 ls
138 pwd
139 source ~/nvm/nvm.sh/nvm.sh
140 source ~/nvm/nvm.sh
141 vi ~/.bash_profile
142 nvm
143 nvm install v0.8.14
144 nvm install v0.10.28
145 vi ~/.bash_profile
146 nvm
147 nvm
148 vi ~/.bash_profile
149 nvm
150 source ~/nvm/nvm.sh
151 nvm
152 source ~/nvm/nvm.sh
153 source ~/.nvm/nvm.sh
154 vi ~/.bash_profile
155 vi ~/.bash_profile
156 nvm
157 vi ~/.bash_profile
158 vi ~/.bash_profile
159 nvm
160 nvm
161 echo “. ~/.nvm/nvm.sh” >> ~/.bash_profile
162 vi ~/.bash_profile
163 cat ~/.bash_profile
164 nvm
165 nvm
166 source ~/nvm/nvm.sh/nvm.sh
167 source ~/nvm/nvm.sh
168 nvm
169 nvm install v0.10.28
170 nvm use v0.10.28
171 nvm alias default v0.10.28
172 npm install -g hexo
173 cat ~/.bash_profile
174 nvm
175 nvm
176 npm install -g hexo@2.6.1
177 nvm
178 sudo root
179 su root
180 hexo
181 cd IDE/
182 ls
183 cd XcodeP/
184 ls
185 cd nodejs/
186 ls
187 cd hexo
188 hexo init
189 ls
190 vi _config.yml
191 cat _config.yml
192 vi _config.yml
193 hexo g
194 hexo generate
195 ls
196 sudo hexo init blog
197 ls
198 cd ../
199 l
200 ls
201 cd hexo/
202 ls
203 hexo init Blog
204 ls
205 npm install
206 cd ../
207 cd hexo
208 ls
209 npm install
210 ls
211 hexo genrate
212 ls
213 cd ../
214 ls
215 cd ../
216 ls
217 cd nodejs
218 ls
219 cd hexo/
220 ls
221 cd ../
222 ls
223 mkdir Blog
224 ls
225 rm -rf hexo
226 ls
227 hexo init
228 ls
229 npm install
230 hexo g
231 hexo generate
232 rm -rf Blog
233 ls
234 cd ../
235 ls
236 cd ../
237 cd nodejs
238 mkdir hexo
239 ls
240 cd hexo
241 ls
242 mkdir hexo
243 hexo init
244 npm install
245 hexo generate
246 s
247 ls
248 hexo generate
249 vi _config.yml
250 hexo generate
251 vi _config.yml
252 hexo generate
253 vi _config.yml
254 vi _config.yml
255 hexo generate
256 hexo n
257 vi _config.yml
258 hexo new
259 cd ../
260 ls
261 cd hexo
262 ls
263 cd hex
264 cd hexo
265 ls
266 hexo new redme.txt
267 ls
268 hexo help
269 help –new
270 hexo help new
271 hexo server
272 hexo server
273 hexo help server
274 cd ../
275 ls
276 cd ../
277 rm -rf hexo
278 l
279 ld
280 ls
281 mkdir Hexo
282 cd Hexo/
283 ls
284 hexo init
285 hexo g
286 hexo s
287 hexo clean
288 hexo clean
289 hexo g
290 hexo s
291 git clone https://github.com/cnfeat/cnfeat.git themes/jacman
292 $ git clone https://github.com/A-limon/pacman.git themes/pacman
293 git clone https://github.com/A-limon/pacman.git themes/pacman
294 cd themes
295 ls
296 cd pacman/
297 ls
298 git pull
299 vi _config.yml
300 ls
301 vi _config.yml
302 hexo g
303 ls
304 cd ../
305 ls
306 cd ../
307 ls
308 cd ../
309 cd Hexo/
310 hexo g
311 hexo s
312 cd ../
313 ls
314 rm -rf Hexo/
315 ls
316 mkdir Hexo
317 cd Hexo/
318 ls
319 hexo init
320 hexo g
321 hexo s
322 npm install
323 ls
324 hexo g
325 cd ../
326 rm -rf Hexo/
327 mkdir Hexo
328 cd Hexo/
329 hexo init
330 ls
331 hexo g
332 ls
333 hexo s
334 vi _config.yml
335 hexo g
336 hexo s
337 hexo d
338 vi _config.yml
339 ls
340 npm install
341 hexo s
342 ls
343 cd node_modules/
344 ls
345 hexo clean
346 cd ../
347 ls
348 hexo clean
349 hexo g
350 ls
351 vi _config.yml
352 ls
353 cd node_modules/
354 ls
355 cd ..
356 ls
357 ls
358 cat package.json
359 cd ..
360 hexo generate
361 ls
362 cd Hexo/
363 ls
364 cat _config.yml
365 vi _config.yml
366 ls
367 cd node_modules/
368 ls
369 cd ../
370 ls
371 cd node_modules/
372 ls
373 cd ../
374 ls
375 hexo s
376 hexo g
377 cd ../
378 ls
379 mkdir Bolg
380 ls
381 cd Bolg/
382 ls
383 hexo init
384 ls
385 hexo g
386 hexo s
387 vim package.json
388 npm install -g hexo-cli
389 su root
390 su root
391 cd IDE/
392 ls
393 rm -rf Bolg/
394 ls
395 mkdir Blog
396 ls
397 cd Blog/
398 hexo init
399 npm install
400 cd ../
401 cd ~
402 ls
403 cd Id
404 cd IDE/
405 ls
406 cd Hexo/
407 sudo npm install
408 ls
409 cd node_modules/
410 ls
411 cd ../
412 ls
413 cd ../
414 cd Blog/
415 ls
416 cd node_modules/
417 ls
418 cd ../
419 ls
420 sudo hexo clean
421 sudo $ npm install hexo –no-optional
422 ls
423 sudo hexo clean
424 ls
425 ls
426 hexo s
427 sudo hexo g
428 hexo s
429 cd ../
430 ls
431 ls
432 rm -rf Blog/
433 sudo rm -rf Blog/
434 ls
435 mkdir Blog
436 cd Blog/
437 ls
438 hexo init
439 ls
440 hexo g
441 npm install hexo –no-optional
442 hexo g
443 hexo s
444 sudo hexo s
445 hexo g
446 ls
447 hexo s
448 hexo server
449 npm install
450 hexo g
451 hexo s
452 hexo new index.html
453 hexo g
454 hexo s
455 ls
456 cd public/
457 ls
458 ../
459 pwd
460 ./
461 ls
462 open .
463 cd ../
464 ls
465 vi _config.yml
466 ls
467 hexo g
468 vi _config.yml
469 hexo g
470 vi _config.yml
471 hexo clean
472 ls
473 vi _config.yml
474 hexo g
475 vi
476 vi _config.yml
477 hexo g
478 vi _config.yml
479 hexo g
480 vi _config.yml
481 vi _config.yml
482 vi _config.yml
483 hexo g
484 vi _config.yml
485 hexo g
486 cat _config.yml
487 vi _config.yml
488 hexo g
489 vi _config.yml
490 hexo g
491 vi _config.yml
492 hexo g
493 vi _config.yml
494 hexo g
495 git deploy
496 hexo deploy
497 npm install hexo-deployer-git –save
498 cd IDE/Blog/
499 ls
500 sudo npm install hexo-deployer-git –save
501 npm install -g cnpm –registry=https://registry.npm.taobao.org
502 cnpm
503 cd IDE/
504 cd Blog/
505 sudo cnpm install hexo-deployer-git –save
506 hexo d
507 hexo g
508 vi _config.yml
509 hexo d
510 vi _config.yml
511 hexo d
512 hexo g
513 hexo d
514 hexo clean
515 hexo g
516 hexo d
517 ls
518 cat package.json
519 hexo server
520 vi _config.yml
521 hexo d
522 vi _config.yml
523 hexo g
524 hexo d
525 hexo d
526 ls
527 hexo d
528 hexo g
529 hexo d
530 history
531 ls
532 cd public/
533 ls
534 open .
535 hexo g
536 hexo g
537 hexo d
538 vi index.html
539 vi index.html
540 hexo g
541 hexo g
542 hexo d
543 vi index.html
544 vi index.html
545 cat index.html
546 hexo d
547 vi index.html
548 hexo d
549 cat index.html
550 touch hexo
551 ls
552 hexo d
553 cd ../
554 ls
555 cd _config.yml
556 vi _config.yml
557 cd public/
558 ls
559 cd ../
560 hexo new hexo
561 cd source/
562 ls
563 cd _posts/
564 ls
565 vim hexo
566 hexo d
567 hexo g
568 hexo d
569 ls
570 vi hexo
571 vi hexo.md
572 hexo g
573 hexo d
574 hexo g
575 hexo d

Quick Start

添加样式和评论UA

1
2
3
4
5
6
7
8
9
10
11
12
13
14
15
16
17
 <script type="text/javascript">
var duoshuoQuery = {short_name:"<%= theme.duoshuo_shortname %>"};
(function() {
var ds = document.createElement('script');
ds.type = 'text/javascript';ds.async = true;
ds.src = '//dexsinister.github.io/embed.js';
ds.charset = 'UTF-8';
(document.getElementsByTagName('head')[0]
|| document.getElementsByTagName('body')[0]).appendChild(ds);
})();
</script>

修改 embed.js 中的id

public 生成的部署文件

themes 需要安装的样式

More info: ClickHere

Run server

1
2
3
4
5
/Users/a000/IDE/Blog/themes/jacman/_config.yml

duoshuo_shortname: dexsinister

apple_icon: favicon.ico

More info: ClickHere

more files

1
2
3
https://github.com/DexSinister/DexSinister.github.io
http://dexsinister.github.io/
http://myhloli.com/duoshuo-ua-and-admin-tab.html

IOS学习经验过程总结

我当时刚学iOS开发的时候一样的感觉 总想知道原理 内部怎么回事 感觉在像在雾里
但是iOS开发就是这样 他是封闭的 本身就是在雾里…
关于iOS开发的学习 打个比方就像把汽车分解
最底层的原料有塑料 钢铁
再用这些底层的东西造出来发动机 座椅
最后再加上写螺丝 胶水等 把汽车就拼起来了
iOS基本都是英文的资料 也由于封闭 文档写的相当好
在遇到新框架的时候

弄明白框架的功能
去文档里搜搜 框架的 Programming Guide 很有用
要弄明白框架类的继承结构
写iOS的程序不一定都是用OBJC 很多框架是用C写的
学习iOS开发基础可以按照下面两个方面学

基础 (原料 钢铁 塑料)

OBJ-C — 语法弄明白 @interface @property 这些东西总要知道是干嘛的 怎么用
基础库 — NSString NSArray NSDictionary等 这些东西在所有的框架里都会出现
iOS大部分类都是继承自NSObject (我还没见过不是继承自NSObject的..)
还有一些 像NSCopying的接口(经@李禹龙提醒 应该叫协议) 不是特别用到开始不用了解
NSObject 创建对象的时候用 + (id)alloc 方法 创建后需要init方法初始化 这个init指的是所有前面是init的方法比如UIView的初始化方法是 - (id)initWithFrame:(CGRect)aRect 在Objc里有很多这样关于函数命名的约定 类似于在python中的函数__xxx
NSString 字符串 NSArray 数组 NSDictionary 字典 这些都需要弄很清楚 其他的类都是一个套路
NSMutableArray 这样带Mutable的类代表可变的 继承自相应的不可变类 比如NSMutableArray继承自NSArray 他们都添加了可以改变对象内容的方法比如
- (void)addObject:(id)anObject 添加对象
- (void)removeObject:(id)anObject 删除对象
上面只是一个大概的总结 还有很多东西需要学 iOS5的SDK已经支持ARC 可以自动进行release 但是对iOS4的支持还有一个小问题 现在要开发应用 可能还需要按照之前的MRC的方式alloc release retain autorelease 之类的内存管理方法 不过如果你现在开始学 到编出像样的APP iOS5可能已经普及了 可以直接用ARC (另 之前对ARC的了解很粗浅 现在开发程序完全可以直接ARC iOS4不支持的weak是有办法替代的 用unsafe_unretained 如果同时支持iOS5和iOS4 用宏判断下就可以 当然也可以直接用assign)
还有一点开始学习的时候肯定很疑惑 内存管理是基于函数名称的 比如带alloc copy的函数 用了之后返回的对象一定要release 这个不用疑惑 照做就行了
文档: http://developer.apple.com/library/mac/#documentation/Cocoa/Conceptual/CocoaFundamentals/Introduction/Introduction.html

高级库(发动机)

UIKit — UI库 OBJC
UIResponder 父类是NSObject UIKit里最底层的库 可以响应一些触摸事件 设置焦点等功能
UIView 父类是UIResponder 所有View的父类 方法太多了 大部分很有用 这个不赘述了 中文的资料也很多了
比如: http://www.cnblogs.com/likwo/archive/2011/06/18/2084192.html
文档: http://developer.apple.com/library/ios/#documentation/WindowsViews/Conceptual/ViewPG_iPhoneOS/Introduction/Introduction.html
关于UIView的子类 有很多 UIButton UITableView 这个都需要各个击破 看看文档从名字上就很容易理解是做什么的
UIViewController 是管理View 和 Model的类 (@张开 说UIViewController是用来管理view的,管理model 的类自己写,当然,model也可以用UIViewController来管理,不过恐怕成为不好的代码。 的确是这样的 Model的改变最好通过Notification来传播 之前吃过这样的亏 最好不要用delegate模式)

UIViewController 管理所有设备发生的事件 比如屏幕旋转 屏幕关闭 或者一些其他的 程序的控制逻辑也应该写在这里
他的初始化函数是- (id)initWithNibName:(NSString )nibName bundle:(NSBundle )nibBundle 后面那个NibName 是Interface Builder 里设计的界面

现在IB已经集成到XCode里了 打开.xib的文件打开的就是IB
IB和代码交互用的是IBAction IBOutlet 这些标记 这些标记追踪到他们的定义其实对编译器来说什么都不表示 只能IB识别
IB也没那么高深 XIB文件解开之后就是一堆代码
之前面过一家小公司 看我当时写的程序里面用到了IB 一脸不屑 说他们都是用代码控制view 意思他们玩的都是高科技 IB都是垃圾 很多人也纠结到底用不用IB 的确 很多时候IB灵活度不行 但是不需要灵活度的时候还不用IB 那不是装X吗 要是没人用苹果还开发IB干嘛 早去掉了 IB在很多时候节省很多工作量

UINavigationController
再说说NavigationController刚接触开发的时候 不明白 View和View之间怎么切换的 最重要的就是UINavigationController 他是一层一层推进view的 打开iPhone里的联系人 每点一个联系人屏幕就会像右推到下一个界面 这就是UINavigationController在做的事
UINavigationController 维护一个堆栈
- (void)pushViewController:(UIViewController *)viewController animated:(BOOL)animated 是像堆栈里压一个UIViewController
- (UIViewController *)popViewControllerAnimated:(BOOL)animated 是从堆栈里弹出来一个UIViewController
就算你的程序不是像联系人那样 向右推进也可以用UINavigationController 管理你的ViewController的层次 可以自己写View切换的动画 关掉他默认的动画
文档: http://developer.apple.com/library/ios/#featuredarticles/ViewControllerPGforiPhoneOS/ModalViewControllers/ModalViewControllers.html

UIWindow 还有个蛋疼的UIWindow 都快忘了他了 因为iOS是从Mac os X过来的 很多东西直接拿来用 这个UIWindow就是 在iOS里 每个App独占屏幕 所以同时存在的只有一个UIWindow 除了在程序加载的时候把我的view 加载到他上 目前我还没用到过其他的
苹果一直很推崇MVC的程序结构 视图 模型 控制器 简单说就是 视图负责显示内容 模型负责所有数据的保存结构或者一些其他数据操作 控制器是用来协调 视图和模型 举车的发动机系统的例子 视图是仪表盘 模型是发动机 控制器是控制芯片

Core Data — 管理数据 OBJC
刚学的时候觉得 CD很高深 其实他是最容易用的库之一 他麻烦之处在于多线程问题 还有胶水代码的问题
建立一个 基于Core Data的工程 你会看到他自动创建3个类的对象

NSManagedObjectModel
管理数据的存储结构文件 扩展名是 xcdatamodeld

NSPersistentStoreCoordinator
用来管理底层数据的存储 用官方的话说
Core Data is not a relational database or a relational database management system (RDBMS).
所以你可以用很多方法存储数据 比如最长用的sqlite 当然如果另类也可以用plist文件 或者其他
NSManagedObjectContext
NSManagedObjectContext 把上面两个对象连在一起 把他们变成一个整体
所有的CD操作都是通过这个类的 这个需要仔细看文档了
举个不恰当的例子 就像三个人收拾衣服 一个人负责衣服的存放位置(NSManagedObjectModel) 一个人负责把衣服分类 冬天穿 夏天穿等(NSPersistentStoreCoordinator) 一个人负责协调他们的工作 并且如果有新增加的衣服或者要移除之前的衣服 通知他俩(NSManagedObjectContext)
NSManagedObject 这个类是具体的数据对象 用上面的例子说就是衣服
一般都是继承这个对象 XCode 可以帮你做 具体搜搜 这种文章很多
NSFetchRequest
用来执行CD请求的 相当与select语句外壳
NSEntityDescription
用来描述实体的 对应sql里的table

NSPredicate
谓语 类似select语句中的条件
上面这三个类就可以用来请求数据了 具体看教程吧
中文介绍:http://c.gzl.name/archives/tag/core-data (访问需要点技术…)
文档: http://developer.apple.com/library/mac/#documentation/cocoa/conceptual/coredata/cdprogrammingguide.html
掌握上面的内容 差不多就能写个APP了 最好的学习方法就是边写边学 自己构想一个小的APP 在做的时候遇到问题 去找找资料 我觉得这样学习比较快 也比较扎实
下面这些库都是有专门功能的库

Core Animation — 制作动画 很强大 很喜欢的框架 可以用少量的代码写出漂亮的动画 C

Quartz 2D — 强大的2D绘图库 C

OpenGL — 不用介绍了 超级强大的3D库 C

Core Image — 听说 iOS5开始支持Core Image 了 还没去看 Mac 上的CI是很强大的

CFNetwork — 从来没用过 我一般都会用ASIHttpRequset 封装好的高层网络库 OBJC实现的 CFNetwork 好像是C实现

Core Location — 获取位置的库 东西很少 很简单 OBJC

AVFoundation — 播放视频相关的库 最近正在学习
这些算是学iOS开发的一些方法 当时要是有人告诉我这些 估计少走不少弯路
还有提醒各位初学者 刚开始学的时候 会有几个月的低谷期 很容易放弃 如果挺过最开始的几个月 后来就越学越容易了
markdown学习小tips

markdown学习小tips

1. 标题设置(让字体变大,和word的标题意思一样)

在Markdown当中设置标题,有两种方式:
第一种:通过在文字下方添加”=”和”-“,他们分别表示一级标题和二级标题。
第二种:在文字开头加上 “#”,通过”#”数量表示几级标题。(一共只有1-6级标题,1级标题字体最大)

这是三级级标题

###这是三级标题

这是四级标题

####这是二级标题

2. 块注释(blockquote)

通过在文字开头添加”>”表示块注释。(当>和文字之间添加五个blank时,块注释的文字会有变化。)

> 注释块一
>> 注释块二
>>> 注释块3
>>>> 注释块4

注释块一

注释块二

注释块3

注释块4

3. 斜体

将需要设置为斜体的文字两端使用1个”*“或者”_“夹起来
将需要设置为斜体的文字两端使用1个星星
将需要设置为斜体的文字两端使用1个杠杠

4. 粗体

将需要设置为斜体的文字两端使用2个”*“或者”_“夹起来
将需要设置为斜体的文字两端使用星星
将需要设置为斜体的文字两端使用杠杠

5. 无序列表

在文字开头添加(, +, and -)实现无序列表。但是要注意在(, +, and -)和文字之间需要添加空格。(建议:一个文档中只是用一种无序列表的表示方式)

  • 无序列表1
  • 无序列表2
  • 无序列表3

6. 有序列表

使用数字后面跟上句号。(还要有空格)

  1. 有序列表1
  2. 有序列表2
  3. 有序列表3

7. 链接(Links)

Markdown中有两种方式,实现链接,分别为内联方式和引用方式。
内联方式:This is an example link.
引用方式:
I get 10 times more traffic from Google than from Yahoo or MSN.

1
2
3
4
5
6
7
内联方式:This is an [example link](http://example.com/).
引用方式:
I get 10 times more traffic from [Google][1] than from [Yahoo][2] or [MSN][3].

[1]: http://google.com/ "Google"
[2]: http://search.yahoo.com/ "Yahoo Search"
[3]: http://search.msn.com/ "MSN Search"

8. 图片(Images)

图片的处理方式和链接的处理方式,非常的类似。
内联方式:alt text
引用方式:
alt text

1
2
3
4
5
6
图片的处理方式和链接的处理方式,非常的类似。
内联方式:![alt text](/img/authorLogo.png "Title")
引用方式:
![alt text][id]

[id]: /img/authorLogo.png "Title"

9. 代码(HTML中所谓的Code)

实现方式有两种:
第一种:简单文字出现一个代码框。使用<blockquote>。(不是单引号而是左上角的ESC下面~中的
第二种:大片文字需要实现代码框。使用Tab和四个空格。

10. 脚注(footnote)

实现方式如下:
hello^hello

11. 下划线

在空白行下方添加三条”-“横线。(前面讲过在文字下方添加”-“,实现的2级标题)

References:

以上内容根据官方文档基本文档进行整理。http://daringfireball.net/projects/markdown/basics
Markdown官方网站:http://daringfireball.net/projects/markdown/

推荐一款在线的Markdown编辑器:https://stackedit.io/